QuickTime and SMIL
This chapter introduces you to SMIL (pronounced “smile”), which stands for Synchronized Multimedia Integration Language. SMIL is a Web Consortium standard for describing multimedia presentations. QuickTime 4.1 and later can play SMIL presentations as if they were QuickTime movies.
The complete SMIL specification is available at
http://www.w3.org/TR/REC-smil/ |
If you are a content author, Webmaster or QuickTime developer, you can use SMIL to create multimedia presentations that play from the desktop or over the Web using the QuickTime plug-in or the QuickTime Player application. This document provides you with a general introduction to SMIL and its usage in QuickTime.
Specifically, QuickTime provides SMIL support for stored streams, such as Video On Demand (VOD). This enables content providers to insert an ad before, during or after a stream. QuickTime also provides SMIL support for live streams, with the ability to insert an ad at the beginning of the stream, as well as parallel streams, which are useful for banner ads in a Web page.
The document is divided into the following major sections:
“Introduction to SMIL” provides a brief overview of SMIL and its key features.
“Getting Started With SMIL” shows how to create a basic layout, define display regions, create a timeline with sequential and parallel media elements, specify media elements and set their durations, and make an element into a clickable link.
“Using SMIL in QuickTime” discusses how SMIL presentations may be used to enhance QuickTime playback.
“Embedding SMIL Documents in a Web Page” discusses the ways you can embed a SMIL document in a Web page so that it plays in QuickTime Player or the QuickTime plug-in.
“SMIL Support in QuickTime” describes the SMIL capabilities, supported in QuickTime, that enable content authors and developers to incorporate advertising clips into stored and live streams of QuickTime movies.
“QuickTime SMIL Extensions in Detail” discusses in detail the extensions to SMIL that allow an author to optionally specify richer behaviors which are supported by QuickTime but do not have a SMIL equivalent.
“Movie Media Handler” describes the features of the Movie Media handler available in QuickTime.
“References” lists some of the documents that are useful sources of additional information.
Introduction to SMIL
A SMIL presentation is similar to a QuickTime movie, in that it can display images, text, audio, and video and can position visual elements on the screen at specified locations; media elements can also be sequenced and synchronized in time. SMIL presentations are described by SMIL documents, that is, text files that specify what media elements to present, and where and when to present them.
Media elements in a SMIL document are specified by URLs. Media elements can be files—such as text files, JPEG images, and QuickTime movies—or live streams. The URLs that specify the media elements can use any of the common protocols—HTTP, FTP, RTSP, file access, and so on.
Importing SMIL Documents
You can import SMIL documents into QuickTime and play them using the QuickTime browser plug-in or QuickTime Player, provided that their individual media elements are all things that QuickTime can play. When you import a SMIL presentation into QuickTime, the SMIL media elements become QuickTime movie tracks, and the SMIL document describes how the tracks are arranged and overlaid in time and space.
SMIL can combine streaming movies with local or Fast Start movies without having to edit or combine them in QuickTime Player. You use a text editor to list the movie URLs and describe where on the screen and in what order to play the movies.
Building Customized Presentations
By stitching together media elements using a text editor and SMIL syntax, you can build customized presentations from existing media—movies, slides, text, and audio recordings—and play them using QuickTime. This gives you a simple way to author QuickTime movies with a text editor.
Because SMIL documents are text files, SMIL also gives you a way to automatically generate customized QuickTime movies using a script, such as an AppleScript, PERL, or CGI script. Anything that can generate text output can create a SMIL document. If you have a script that inserts banner ads into your Web pages, for example, you could use the same script to insert the ads into a SMIL document along with a streaming QuickTime movie.
Movie Tracks
SMIL also provides an easy way to make use of a new QuickTime feature—tracks in QuickTime movies that are QuickTime movies. These are called movie tracks, and are similar to text tracks, video tracks, or sound tracks, but point to other movies. Movie tracks have their own time base, so they can play forward, play backward, repeat, or loop, independently of the movie that contains them. When QuickTime imports a SMIL document, it creates a movie track for each SMIL media element.
Using wired sprites, you can start or stop a movie track at any time—while the rest of the movie is paused or plays normally—which is useful for creating interactive sound or interactive animation. You can put sound or animation in one movie, then create a wired sprite movie that controls the sound or animation using intermovie communication. Then you can stitch the movies together into a single presentation using SMIL.
Getting Started With SMIL
This section shows you how to work with SMIL to create a basic layout, define display regions, create a timeline with sequential and parallel media elements, specify media elements and set their durations, and make an element into a clickable link. This section also illustrates a technique to show different elements to different viewers using a switch.
Overview
Because SMIL presentations are described by text files, you can create or edit a SMIL presentation using a text editor, and automatically generate a SMIL document using any script language that creates text files. A SMIL document specifies what media elements to present, and where and when to present them. Each media element is specified by a URL.
A SMIL presentation can use any media elements that QuickTime can play, including still images, audio, text, QuickTime movies, sprite animations, live streams, VR panoramas and VR object movies. The URL of a media element can point to local or remote media, using any format that QuickTime supports, including file access, HTTP, and RTSP.
Like the tracks in a QuickTime movie, the media elements in a SMIL presentation can be sequenced, overlapped, or offset in time and space. In addition, SMIL lets you select from a set of elements based on things like the user’s language or Internet connection speed. A SMIL presentation is similar to a QuickTime movie that depends on external media files.
SMIL Structure
SMIL is based on XML, which is more rigidly structured that HTML, but it uses the same familiar <tag> and </tag> syntax.
SMIL is different from HTML in that all the tags are case-sensitive (always lowercase) and all tags have to be explicitly ended—either there are a pair of tags that enclose other elements (<tag parameters> elements </tag>) or a tag is self-contained and ends with “/>” (<tag parameters />).
SMIL also differs from HTML because HTML routinely mixes structure and content together in the same document, whereas SMIL normally does not. Where an HTML document contains text to be displayed, a SMIL document would contain the URL of a text file instead.
Like HTML, a SMIL document has a head and a body. The structure of a SMIL file is shown below.
<smil> |
<head> |
<layout> |
<!-- layout tags --> |
</layout> |
</head> |
<body> |
<!-- body tags --> |
</body> |
</smil> |
All the layout information is specified in the head. The head controls the physical layout, and where things are seen on screen. The media elements are listed in the body, which controls the temporal sequencing––that is, when, what, and where (region).
Layout
The layout specifies the whole display area for the presentation, then defines regions where individual media elements can be displayed.
Root Layout
A SMIL layout always starts with a <root-layout /> tag that gives the dimensions of the display area in pixels and assigns a background color.
<layout> |
<root-layout id="main" width="320" height="240" |
background-color="red" /> |
</layout> |
The id parameter gives the presentation a name; it can be anything you like. The height and width parameters define the display area for the presentation in pixels. You can specify the background color using hexadecimal values ("#FF0000") or names ("red"). The following is a very simple SMIL document—it’s just a red rectangle, but you can play it using QuickTime Player:
<smil> |
<head> |
<layout> |
<root-layout id="main" width="320" height="240" |
background-color="red" /> |
</layout> |
</head> |
<body> </body> |
</smil> |
Regions
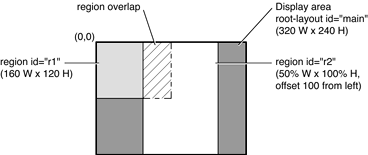
The layout also defines regions within the display area (Figure 9-1). Regions themselves are invisible, but they define areas where visual media elements can be displayed. Regions can be positioned anywhere in the display area and can overlap.
A layout that specifies a root layout and two regions:
<head> |
<layout> |
<root-layout id="main" width="320" height="240" |
background-color="red"/> |
<region id="r1" width="160" height="120" /> |
<region id="r2" width="50%" height="100%" |
left="100" top="0" /> |
</layout> |
</head> |
The first region is named r1, and is 160 x 120 pixels, extending from the top left corner of the display area (the default position for a region).
The second region, r2, is half as wide as the display area (width="50%) and fills it from top to bottom (height="100%"). Region r2 is offset 100 pixels from the left edge of the display area (left="100"). Since the first region is 160 pixels wide, the two regions overlap by 60 pixels.
The <region /> tag accepts the following parameters:
heightandwidth—define the size of the region, either in pixels or as a percentage of the display area.topandleft(optional)—specify the position of the region within the display area, either in pixels or as a percentage of the display area.
If you want to set the top or left parameter, you must specify both top and left as a pair, even if one of them is zero.
By default, a region extends from the top-left corner of the display area. You can change this by specifying a top and left offset. For example, top="50%" left="100" creates a region whose top-left corner is halfway down and 100 pixels from the left edge of the display area.
When regions overlap, one lies on top of the other. By default, a region defined later in the layout is on top of any regions defined earlier. You can set the layering explicitly using the z-index parameter. The layer with the highest z-index value is on top. (Note that in QuickTime movies, the layer with the lowest value is on top.) For example, the following layout defines three regions.
<region id="r1" width="160" height="120" z-index="3" /> |
<region id="r2" width="160" height="120" z-index="2" /> |
<region id="r3" width="160" height="120" z-index="1" /> |
The three regions overlap completely, with r1 on top, r2 in the middle, and r3 at the bottom of the pile. If no z-index values had been specified, the layering would be reversed, with the last-defined region on top.
fit(optional)—defines how media elements are cropped or scaled if they don’t have the same pixel dimensions as the region they’re displayed in. There are four possible values for this parameter:fit="hidden"(default)—images are not scaled. If an image is larger than the region, it is cropped. If an image is smaller than a region, part of the region is left empty.fit="fill"—images are scaled to match the height and width of the region, so an image always fills the region completely. The image’s aspect ratio may be distorted to make it fit.fit="meet"—images are scaled to meet the region’s boundaries while preserving each image’s aspect ratio, without cropping. An image may not fill the region completely, but always fills either the whole width or the whole height. The image is not cropped or distorted.fit="slice"—images are scaled to fill the region completely while preserving each image’s aspect ratio, cropping if necessary. If the aspect ratio of an image differs from the region, the image is cropped by taking a slice from the edge or bottom where it would extend beyond the region.The top-left corner of a media element is always aligned with the top-left corner of the region it is displayed in. If you need to position an image somewhere else, just create another region at a different position—you can have as many regions as you like, and each one uses only a few bytes.
The following is a SMIL document with two overlapping regions. It looks like a red rectangle when you play it using QuickTime Player. Because regions are invisible, they just define areas where media elements can be displayed.
<smil> |
<head> |
<layout> |
<root-layout id="main" width="320" height="240" |
background-color="red"/> |
<region id="r1" width="160" height="120" /> |
<region id="r2" width="50%" height="100%" left="100" |
top="0" fit="fill" /> |
</layout> |
</head> |
<body> </body> |
</smil> |
The Body
The body of a SMIL document specifies what media elements to present, which regions to display the visual elements in, and a timeline for the presentation.
The timeline groups media elements in two ways: things that happen in sequence and things that happen in parallel. If you don’t specify whether elements should be played sequentially or in parallel, QuickTime plays them in sequence. Sequences are surrounded by the <seq> and </seq> tags. Media elements in a sequence are presented one after the other—each element is presented after the previous element ends. There are different ways to determine when an element should end.
Media elements such as audio and video have an inherent duration, so they end when you would expect them to. For example:
<seq> |
<audio src="audio1.mp3" /> |
<audio src="audio2.aiff" /> |
<audio src="audio3.wav" /> |
</seq> |
Note that audio components have no visual part, so a region is not defined.
This sequence plays three audio files in a row. Each element ends when the audio has played all the way through. As soon as one element ends, the next begins. Media elements such as still images and text have no inherent duration, so they’re usually assigned explicit durations:
<seq> |
<image src="image1.jpg" region="r1" dur="5 sec" /> |
<image src="image2.gif" region="r1" dur="7 sec" /> |
</seq> |
In this example, the first image ends after being displayed for 5 seconds, then the second image appears and is displayed for 7 seconds. If you specify an explicit duration for an element that has its own inherent duration, it either ends when it normally would or after the duration you specify, whichever comes first.
Media elements that are displayed at the same time are surrounded by the <par> and </par> tags. Parallel elements are presented starting at the same time, but they don’t necessarily end at the same time. For example:
<par> |
<audio src="themesong.mp3" /> |
<image src="poster.jpg" region="r1" dur="30 sec" /> |
<text src="lyrics.txt" region="r2" dur="30 sec" /> |
</par> |
This example plays an MP3 audio file while simultaneously displaying a JPEG image in one region and some text in another. The image and the text are displayed for 30 seconds; the audio element ends whenever the MP3 finishes playing.
Combining Sequences and Parallel Groups
You can put a group of parallel elements into a sequence. The parallel group is treated as a single element in the sequence. All the elements in the parallel group start together at the appropriate point in the sequence. When the last element in the parallel group ends, the sequence continues.
An example:
<seq> |
<video src="Intro.mov" region="r1" /> |
<par> |
<audio src="narration.aiff" /> |
<video src="slides.mov" region="r1" /> |
</par> |
<text src="credits.txt" dur="20 sec" region="r1" /> |
</seq> |
In this example, Intro.mov plays first. The narration and the slides start together as soon as Intro.mov ends. When both the narration and the slides have ended, the credits are displayed.
SMIL Media Elements
SMIL media elements are classified by type and specified by URL. Each visual media element is assigned to a region defined in the layout. The media type, the URL, and the region for visual media must be specified. All other parameters are optional.
There are currently six defined media types:
<audio /> (non-visual)<video /><image /><text /><textstream /><animation />
You use the media type that most closely describes a given media element. For a sound-only QuickTime movie, for example, you use the <audio/> media type. SMIL isn’t terribly strict about this, so you can specify a FLIC animation file, for example, using <animation /> or <video />. Each media element is specified by a src parameter whose value is a URL. The URL can be absolute or relative and can use any protocol that QuickTime understands, including HTTP and RTSP.
Some example media types and URLs:
<audio src="http://www.myserver.com/path/myaudio.mp3" /> |
<video src="rtsp://streamserver.com/VideoOnDemand.mov"/> |
<image src="slides/slide01.jpg" /> |
<text src="subtitles.txt" /> |
<textstream src="rtsp://streamserver.com/streamtext.mov" /> |
<animation "http://www.myserver.com/myanim.flc" /> |
If the URL is specified as a local file, it would be file:///.
Important: The QuickTime plug-in can resolve absolute or relative URLs, and QuickTime Player can resolve absolute URLs, but as of this writing, QuickTime Player cannot resolve relative URLs unless they refer to documents in the same folder as the SMIL document itself. In other words, if you’re targeting QuickTime Player, you can specify a relative URL such as src="movie.mov", but not src="../movie.mov" or src="subfolder/movie.mov".
One URL protocol you may not be familiar with is data:, which lets you embed a media element inside your SMIL document. It’s normally used to embed small amounts of text that would otherwise require a separate file. Here’s an example of a data: URL:
<text region="aregion" dur="1:30" src="data:text/plain,Copyright Apple Computer, 2000" />
Note: The data: protocol identifier is followed immediately by the data format and a comma, then the actual data. Images can be embedded using the Base64 data format.
Region
Every visual media element needs to be assigned to a display region defined in the layout. Only one element can be displayed in a region at any time (but you can have multiple regions covering the same screen area).
If the media element contains an image that is larger or smaller than its assigned display region, the image can be scaled, clipped, or both scaled and clipped, depending on the fit parameter for that region.
Note: Clipping and scaling are attributes of a region, not a media element. To use different scaling or cropping guidelines for different images, create multiple regions covering the same area but with different fit parameters.
A SMIL document that displays a series of JPEG images:
<smil> |
<head> |
<layout> |
<root-layout id="slideshow" width="320" height="240" |
background-color="black"/> |
<region id="r1" width="100%" height="100%" fit="meet" /> |
</layout> |
</head> |
<body> |
<seq> |
<image src="http://www.myserver.com/ourlogo.jpg" |
region="r1" dur="5sec" /> |
<image src="slide1.jpg" region="r1" dur="5sec" /> |
<image src="slide2.jpg" region="r1" dur="5sec" /> |
</seq> |
</body> |
</smil> |
This example displays a sequence of three JPEG images. All the images are displayed in the same region and are automatically scaled to fill the region as completely as possible without clipping or changing their aspect ratios. Each image has a duration of 5 seconds.
Duration
Some media elements, such as audio and video, have inherent duration. Text and still images, however, have no inherent duration. The easiest way to assign a duration is with the dur parameter. For example:
<image src="slide1.jpg" region="r1" dur="30sec" /> |
You can assign an explicit duration to override an element’s inherent duration. For example, if you specify
<audio src="sound1.wav" dur="1:05" /> |
the audio file sound1.wav ends after 1 minute 5 seconds, or when the audio finishes naturally, whichever comes first.
Duration is specified in Hours:Minutes:Seconds.DecimalFractions. You can leave off the hours, or the hours and minutes, or the fractions. You can add the “sec” identifier to make things more readable. These are all equivalent:
dur="00:00:05.000" |
dur="00:05.000" |
dur="05.000" |
dur="05" |
dur="5 Sec" |
Another way to explicitly set an element’s duration is to specify an end time or an end event. An element ends when its duration is exceeded, its end time or end event occurs, or it reaches its inherent end, whichever comes first. Setting begin and end parameters are discussed next.
Begin and End
You can specify an explicit start time and end time, or an event that triggers an element’s start or end, using the begin and end parameters. The time value that you specify is relative to when the element would normally begin.
For example, when you specify
<image src="slide1.jpg" region="r1" begin="5sec"/> |
you get this timing:
If the element is part of a
<seq> </seq>sequence, it begins 5 seconds after the preceding element ends.If the element is part of a
<par> </par>group, it begins 5 seconds after the parallel group as a whole begins.
If you specify an end time, the element ends that amount of time after it would naturally begin. For example:
<image src="slide1.jpg" region="r1" begin="5sec" end="35sec" /> |
In this example, the image begins 5 seconds after its natural start time, and it ends 35 seconds after its natural start time, giving it a duration of 30 seconds. The element’s duration is equal to its end time minus its start time. If no begin value is specified, an end value is the equivalent of a dur value.
Alternately, you can specify that an element should begin or end when another element begins, ends, or reaches a specified duration. Instead of using a time as the value of the begin or end parameter, use the string
"id(idname)(event)" |
where idname is the id value of another element, and event is either begin, end, or a time value. For example:
<par> |
<audio src="themesong.mp3" id="x" /> |
<image src="poster.jpg" region="r1" end="id(x)(end)" /> |
<text src="lyrics.txt" region="r2" end="id(x)(end)" /> |
</par> |
This example assigns an id of x to the audio and sets the end of the image and text elements to synchronize with the end of element x.
Another example:
<par> |
<audio src="Sound1.aif" id="master" /> |
<audio src="Sound2.aif" begin="id(master)(5sec)" /> |
<audio src="Sound3.aif" end="id(master)(end)" /> |
</par> |
In this example, the element Sound1.aif begins normally and has the id of "master". Sound2.aif begins 5 seconds after master begins. Sound3.aif begins normally, but ends when master ends.
Clickable Links
You can make any visual media element in a SMIL document into a clickable link by using the <a> </a> tags. You can direct the URL to load in a browser window or to replace the current SMIL presentation.
To make a visual element into a link, you
precede the element with the
<a>tag.put the URL of the link in the
hrefparameter.set the
showparameter to"new"or"replace".follow the element with the
</a>tag.
The end result looks like this:
<a href="http://www.apple.com/" show="new" > |
<image src="poster.jpg" region="r1" dur="00:05" /> |
</a> |
In this example, if the user clicks in region r1 while poster.jpg is being displayed there, the Apple website loads in the default browser window.
The show parameter can have two possible values:
show="replace"—replaces the current SMIL presentation in the plug-in or QuickTime Player (whichever is active). The URL must specify something that QuickTime can play.show="new"—opens the URL in the default browser window. The URL can specify a Web page or anything the browser or one of its plug-ins can display.
You can use show="new" to target a specific browser frame, specific browser window, or QuickTime Player, using the target SMIL extension. Refer to the section “QuickTime SMIL Extensions,” for more information. If you use the chapter SMIL extension, you can jump to a named point in the current presentation by specifying show="replace" href="#chapname".
QuickTime doesn’t currently allow you to jump to a named point in another SMIL presentation—you can’t use URLs of the form href=fname.smi#name.
Throwing a Switch
You can automatically present different elements to different viewers using the <switch> </switch> tags.
SMIL supports a set of user attributes, such as screen resolution, color depth, maximum data rate, and language. Groups of elements can be listed between <switch> and </switch> tags. QuickTime selects one element from the list based on user attributes, much like QuickTime’s alternate track and alternate movie mechanism.
This can be used to select an audio track based on language, for example:
<switch> |
<audio src="french.aif" system-language="fr"/> |
<audio src="german.aif" system-language="de"/> |
<audio src="english.aif" system-language="en"/> |
</switch> |
This example selects french.aif for French speakers, german.aif for German speakers, and english.aif for English speakers.
The <switch> element selects the first item in the list that matches the user’s system attributes. If you’re selecting an item based on connection speed, list the elements from highest speed to lowest speed—QuickTime loads the first element the viewer’s connection speed can handle:
<switch> |
<audio src="192k.mp3" system-bitrate=192000"/> |
<audio src="128k.mp3" system-bitrate="128000"/> |
<audio src="qdesign.mov" system-bitrate="28800"/> |
</switch> |
This example plays 192k.mp3 for people with high-speed connections, 128k.mp3 for people with connections slower than 192 Kbits/sec, but as fast or faster than 128 Kbits/sec, and qdesign.mov for people with connections slower than 128 Kbits/sec, but at least 28.8 Kbits/sec.
To provide a default, make the default the last item in the list and don’t specify any required attributes. For example:
<switch> |
<audio src="french.aif" system-language="fr"/> |
<audio src="german.aif" system-language="de"/> |
<audio src="english.aif"/> |
</switch> |
This example selects french.aif for French speakers, german.aif for German speakers, and english.aif for all others. It’s almost always a good idea to include a default.
QuickTime supports the following user attributes:
system-bitrate—corresponds to the user’s connection speed in the QuickTime Settings control panel. For example: 14400, 33600, 56000, 128000.system-language—corresponds the user’s system language setting. The language is specified by a two-character code matching the ISO 639 language code specification, such as these:Language
Code
Language
Code
Arabic
AR
Japanese
JA
Chinese
ZH
Korean
KO
Danish
DA
Persian (Farsi)
FA
Dutch
NL
Polish
PL
English
EN
Portuguese
PT
French
FR
Russian
RU
German
DE
Spanish
ES
Greek
EL
Swahili
SW
Italian
IT
Swedish
SV
For additional language codes, refer to
http://www.oasis-open.org/cover/iso639a.html |
system-screen-size—the minimum required screen resolution in pixels. The resolution is specified byHeightxWidth. Note that this is contrary to common usage—a 640 x 480 minimum screen resolution is specified bysystem-screen-size="480x640".system-screen-depth—the minimum required color depth, in bits. Common values are 8 (256 colors), 16 (thousands of colors), and 24 (millions of colors).
Note: For selections based on bit rate, screen size, or screen depth, always list the elements from most demanding to least demanding, and always include a default element with no required attributes as the last item in the list.
The next section discusses using SMIL in QuickTime.
Using SMIL in QuickTime
SMIL presentations may be used to enhance QuickTime playback. You can create standard SMIL documents and play them from the desktop or in a browser as if they were QuickTime movies. There are also QuickTime-specific extensions to SMIL that you can use to enhance your presentations.
Creating QuickTime-Friendly SMIL Documents
For QuickTime to play a SMIL presentation, the presentation must be made up of media elements that QuickTime can play individually. This includes QuickTime movies, real-time streams in QuickTime format, AIFF and MP3 sound files, JPEG and GIF images, FLIC animations, text files, and MIDI music files.
If you can use a URL in the QTSRC parameter of an <EMBED> tag, and the QuickTime plug-in can play it successfully, you can use that URL as a media element in a SMIL document for QuickTime.
QuickTime doesn’t currently support the whole SMIL specification. You can use all the SMIL tags and parameters described in the tutorial, but if you’re working from the W3C specification, note the following exceptions:
Regions can’t have scroll bars (don’t use
fit="scroll" in the <region> tag).Only the basic layout is supported (no CSS-based layout).
The
<switch>tag can’t be used to specify a root layout from a list.Hyperlinks can’t be used to pause the current SMIL presentation, load another one, then resume the current presentation (don’t use
show="pause"in the<a>tag).You can’t jump to a named point in another SMIL presentation—don’t use links of the form
<a href="fname.smi#anchor" >.
Examples
A common use of SMIL is to specify an advertisement that should play when the viewer requests a live stream. The following is a simple SMIL document that does just that. It defines a display area and a background color, then specifies two display regions—one for the ad and one for the live stream. It plays an ad—a QuickTime movie from a CD—that includes a click-through link to www.apple.com. When the ad is done, the SMIL document opens a live stream, in this case the BBC world news.
<smil> |
<head> |
<layout> |
<root-layout id="rl" width="320" height="240" |
background-color="red"/> |
<region id="ad" width="200" height="240" left="60" top="0" /> |
<region id="bbc" width="100%" height="100%" fit="fill" /> |
</layout> |
</head> |
<body> |
<seq> |
<!-- ad --> |
<a href="http://www.apple.com"show="new"> <!-- opens a new browser window if the ad is clicked on --> |
<video src="sample.mov" region="ad"/> |
</a> |
<!-- live stream --> |
<video src="rtsp://a628.q.kamai.net/7/628/52/935780134/ |
qtv.akamai.com/bbc/bbc100" region="bbc" /> |
</seq> |
</body> |
</smil> |
Note that the ad is centered by specifying a top and left offset for the ad region. Note also that you must specify both top and left as a pair, even though the top offset is 0. The live stream’s region is set to 100% of the available display area, and the stream’s visual area is scaled up to fill the region by specifying fit="fill".
As another example, here’s a way to create a narrated slide show using SMIL:
Step through your slides using any tool, such as PowerPoint, JPEGView, or QuickTime Player (Present Movie—Slide Show mode).
Record a narration as you go, using recording software or recording to tape and capturing to disk later.
Open your narration in QuickTime Player, choose Get Info, and display the movie time as you listen to your narration.
Write down the appropriate time to begin displaying each slide.
Write a SMIL document similar to the one below, substituting the URLs of your slides and narration, and changing the slide durations as appropriate.
<smil>
<head>
<layout>
<root-layout id="rl" width="320" height="240"
background-color="black" />
<region id="slides" width="320" height="240" />
</layout>
</head>
<body>
<par>
<audio src="narration.aif" />
<seq>
<img src="slide1.jpg" region="slides" dur="5S" />
<img src="slide2.jpg" region="slides" dur="15S" />
<img src="slide3.jpg" region="slides" dur="10S" />
</seq>
</par>
</body>
</smil>
This creates a slide show that starts the audio narration and the first slide in parallel, then displays the slides in sequence, giving each slide the specified duration.
Special Media Types
Text files, QuickTime VR panoramas and object movies, and HTML pages can all be specified as media elements in SMIL documents for QuickTime, but they deserve special mention.
Text
You normally specify a text file as a media element using the <text> tag: <text src="http://my.server.com/some.txt" region="r1" dur="5" />
Other SMIL players may present the whole text file as a block of text. QuickTime displays the text as it would any text file imported into QuickTime Player. You can see how the text will be displayed by importing it into QuickTime Player using the default import settings.
To modify the way the text is presented, import the text into QuickTime Player using any settings you like, export it as Text with Descriptors, and edit the descriptors in the exported file as needed. You can also generate a text file that includes QuickTime text descriptor tags using a CGI script or other software.
You can use a text file with QuickTime text descriptors as a SMIL media element when playing the SMIL file with QuickTime. All the descriptors are supported, including scrolling, keyed text, and hyperlinks.
SMIL considers text as not having an inherent duration, but importing a text file into QuickTime creates a movie with a duration of 2 seconds for each paragraph of text.
If you specify a duration for a text element that’s less than the duration of the text movie that Quicktime creates, the display of the text movie is truncated.
You can get around this by specifying the text file using the <video> tag: <video src="http://www.server.com/some.txt" region="aregion" />
This causes the text to be displayed for the duration of the text movie that QuickTime creates.
VR
Specify a QuickTime VR panorama or object movie using the <video> tag:
<video src="http://www.myserver.com/vr.mov" region="aregion" /> |
You can use VR panoramas and object movies, including multinode panoramas, and VR movies that have been enhanced using wired sprites.
However, VR movies inside SMIL presentations don’t have a VR controller attached. Viewers can navigate the VR movie using the mouse to drag left, right, up, and down, and to click from node to node, but they can’t zoom in or zoom out. You can add zoom controls by adding a wired sprite controller to the VR movie.
HTML
You can’t display HTML pages inside QuickTime Player or the QuickTime plug-in. It’s possible to use SMIL to display media from a Web page in QuickTime Player or the QuickTime plug-in, however. This capability is currently very limited, but it may be sufficient for your needs.
Suppose you want QuickTime to display an animated GIF, for example, but you don’t have a URL for the GIF itself, just the URL of a Web page that uses the GIF as a banner ad.
Note: This is fairly common if you have a script that generates Web pages and inserts banner ads according to an algorithm, and you want to take advantage of this script to put the same ad in a SMIL presentation.
Use the SMIL <image> tag to set up the presentation for the GIF, but use the URL of the Web page that contains the GIF in the SRC parameter. For this to work, you need to explicitly set the MIME type to HTML in the element tag: type="text/x-html-insertion"
The SMIL element looks like this:
<image src="http://www.myserver.com/index.html" |
type="text/x-html-insertion" region="aregion" dur="time" /> |
QuickTime opens the HTML document specified in the URL and scan it for a playable media element specified by a SRC parameter. QuickTime follows a particular logic in scanning a document for a playable element:
First, it looks for an
<A HREF>tag that uses an image for an anchor, such as<A HREF="www.sponsor.com"><IMG SRC="adbanner.gif"></A>If no
<A HREF>tag with an image source is found, QuickTime looks for an<EMBED>tag with a playable source, such as<EMBED SRC="playable.mov">If no
<EMBED>tag with a playable source is found, QuickTime looks for an<IMG>tag, such as<IMG SRC="displaythis.jpg">
QuickTime takes the first source that it finds using this logic and attempts to use it as the media element specified in the SMIL document. For this to work, the first source QuickTime finds needs to match the specified element type, such as audio, video, or image.
Here’s an example of a Web page with a banner ad, and a SMIL document that uses the banner ad from the Web page as a clickable link over a streaming movie:
<HTML> |
<HEAD><TITLE>Welcome to XYZ Corp</TITLE></HEAD> |
<BODY> |
<A HREF="sponsor.htm"><IMG SRC="adbanner.gif"></A> |
... |
</BODY> |
</HTML> |
<smil> |
<head> |
<layout> |
<root-layout height="290" width="512" |
background-color="black" /> |
<region id="ad" height="50" width="512" /> |
<region id="movie" height="240" width="320" |
top="50" left="98" /> |
</layout> |
</head> |
<body> |
<par> |
<a href="sponsor.htm" show="new"> |
<image src="welcometoxyz.html" |
type="text/x-html-insertion" |
region="ad" end="id(x)(end)" /> |
</a> |
<video src="rtsp://server/stream.mov" |
region="movie" id="x" /> |
</par> |
</body> |
</smil> |
QuickTime SMIL Extensions
SMIL is an extensible standard, and QuickTime provides several SMIL extensions. This allows you to add QuickTime-specific attributes to your SMIL presentation, such as autoplay="true".
To use QuickTime extensions in your SMIL document, include the xmlns: parameter and the URL of the QuickTime extensions as part of the initial <smil> tag:
<smil |
xmlns:qt="http://www.apple.com/quicktime/resources/smilextensions"> |
QuickTime doesn’t actually access the URL; it’s used only to uniquely identify the QuickTime SMIL extensions.
You can include QuickTime extensions within the <smil> tag along with the URL. For example, to create a SMIL presentation that starts automatically:
<smil |
xmlns:qt="http://www.apple.com/quicktime/resources/smilextensions" |
qt:autoplay="true"> |
In the examples that follow, the xmlns: parameter and the URL have been omitted for readability, but they are a required part of the <smil> tag when any QuickTime extensions are used in a SMIL presentation. These are the current QuickTime SMIL extensions:
autoplay Specifies whether the presentation should play automatically. Legal values are
trueorfalse. The default isfalse.
Example: <smil qt:autoplay="true">
next Specifies a presentation to play when this presentation finishes. Legal value is the URL of something QuickTime can play: a media file, a movie, a stream, or a SMIL presentation. This is similar to the QuickTime plug-in’s
QTNEXTparameter.
Example: <smil qt:next="nextpresentation.smi">
time-slider Specifies whether the movie controller should include a Time slider. During a SMIL presentation, QuickTime dynamically loads media elements as required, so the known duration of the overall presentation can change as a movie is played or navigated. When the known duration changes, the scale of the Time slider changes to reflect that. This can be confusing to the viewer. Because of this, QuickTime movies created from SMIL documents do not normally display a Time slider. Legal values are
trueandfalse. Default isfalse.
Example: <smil qt:time-slider="true">
Note: If you want to import a SMIL presentation into QuickTime and edit it using QuickTime Player’s editing features—to add a chapter list for example—you must set time-slider="true". QuickTime Player’s editing features rely on the Time slider.
immediate-instantiation When used in the
<smil>tag, specifies whether all the media elements in the presentation should be downloaded (or streamed) immediately, or whether this should be deferred until each element is about to be played. Legal values aretrueandfalse. Default isfalse. Opening all the media elements at the beginning of the presentation can take considerable time and memory, so we recommend that it be done only for simple presentations with a few small media elements. When used in an element tag, specifies that this particular element should be downloaded or streamed as soon as the presentation is opened. You might use this to preload an element to be sure it is already in memory when it needs to play.
Example: <smil qt:immediate-instantiation="true">
Example: <imgsrc="bgimg.png"qt:immediate-instantiation="true"/>
composite-mode Specifies the graphics mode of a media element. This is used to create partial or complete transparency. Possible modes are
copy none direct These modes all specify no transparency, which is the default for most image formats.
blend;percent Specifies a blend between the image and the background, with a required percent integer value (for example,
50%) specifying the blend weight—0%means complete transparency,100%complete opacity.transparent-color;color Specifies that all pixels of a particular color within the image should be treated as transparent. It accepts a second parameter, color, that specifies the color to be rendered as transparent. The color parameter may be any valid color specification supported by Cascading Style Sheets Level 2 4.
alpha straight-alpha premultiplied-white-alpha premultiplied-black-alpha Specify that the image has an internal alpha channel that should be used when compositing. The
alphaandstraight-alphamodes refer to a separate alpha component; thepremultipliedmodes refer to an image that has been premultiplied with the alpha against a white or black background, respectively.straight-alpha-blend;percent Specifies that the image has an internal alpha channel as a separate component, and that an additional level of transparency should be applied to the whole image.
Example: <imgsrc="test.png"qt:composite-mode="alpha" />
bitrate Specifies the bandwidth a media object needs in order to play back in real time. This is used to give QuickTime enough information to decide how far in advance to begin loading a media element to provide seamless playback. Possible values are positive integers, in bits-per-second.
Example: <videosrc="stream56k.mov"qt:bitrate="56000" />
Important: Don’t confuse qt:bitrate with system-bitrate. Use system-bitrate to select a media element based on the user’s connection speed. Use qt:bitrate to help QuickTime determine when to start downloading a media element.
system-mime-type-supported Specifies the MIME type that needs to be supported in order to play a media element. This is normally used in conjunction with the
<switch>tag to allow the player software to choose a media element that it can handle. Possible values are character strings matching a valid MIME type.
Example:
<switch> |
<imgsrc="qt.mov" |
qt:system-mime-type-supported="video/quicktime"/> |
<imgsrc="someotherformat.suffix" |
qt:system-mime-type-supported= "other/mime-type"/> |
</switch> |
chapter-mode Specifies whether the Time slider represents the duration of the whole presentation or the duration of the current chapter. Legal values are
allandclip. Specifyallfor the whole presentation,clipfor chapter-at-a-time.
Example: <smil qt:chapter-mode="clip"/>
chapter Specifies a chapter name for a media element. Valid values are any character string. Use this in conjunction with the
<a>tag and a URL of the formhref="#chapname"to create clickable links to named points in the presentation.
Example:
<videosrc="some.mov"qt:chapter="chap1" region="r1" /> |
... |
<a href="#chap1" show="replace" > |
<img src="BackToChap1.gif" region="r2" dur="5:00" /> |
</a> |
In the example above, clicking in region r2 while BackToChap1.gif is displayed rewinds the presentation to chap1, causing some.mov to restart.
target Specifies a target for a presentation specified by the
hrefparameter in the anchor tag. Possible targets are an existing browser window, a browser frame, orquicktimeplayer. If the target string is none of these, a new browser window is created. Used in conjunction withshow="new".
Example:
<ahref="http://www.server.com/another.smi"show="new" |
qt:target="quicktimeplayer"> |
<img src="OpenNewSMIL.gif" region="r2" dur="5:00" /> |
</a> |
New SMIL Extensions Added in QuickTime
The current release of QuickTime includes the addition of several new SMIL extensions.
The SMIL extension, "qt:preroll", accepts an integer representing the number of seconds to open and prepare to play an embedded movie. The attribute can be added to any media object; the default remains 15 seconds.
The begin-clip and end-clip attributes are now supported for media elements.
Another SMIL extension allows fullscreen playback by adding "qt:fullscreen" to the SMIL element. "qt:fullscreen" can be set in the SMIL header; it accepts one of the following attributes:
qt:fullscreen="fullscreen_false" |
qt:fullscreen="fullscreen_normal" |
qt:fullscreen="fullscreen_double" |
qt:fullscreen="fullscreen_half" |
qt:fullscreen="fullscreen_full" |
qt:fullscreen="fullscreen_current" |
Relative URLs work with qtnext user data and with the "qt:next" attribute of SMIL documents. Therefore, the following works:
<smil xmlns:qt="http://www.mywebsite.com/quicktime/resources/smilextensions" qt:next="in_the_same_directory_as_this_document.mov"> . . . </smil>
Embedding SMIL Documents in a Web Page
There are four ways you can embed a SMIL document in a Web page so that it plays in QuickTime Player or the QuickTime plug-in:
Use the
QTSRCparameter.Save the SMIL document as a
.movfile.Make a Fast Start reference movie.
Target the SMIL document to QuickTime Player using
HREForQTNEXT.Important: Other browser plug-ins, such as RealPlayer and Windows Media Player, also use SMIL, but support a different set of media elements. The viewer’s browser may be configured to use any of these plug-ins for
.smlfiles. To be sure that QuickTime handles your SMIL document, use one of the techniques described in this section.
It’s also important for your webmaster to configure your Web server to associate the .sml file extension with the MIME type application/smil. Otherwise, the browser may treat the SMIL document as a text file. This is a fairly common problem, because SMIL documents are text files.
Using QTSRC
The <EMBED> tag’s QTSRC parameter is the ideal way to pass a SMIL document to QuickTime. The SRC parameter should point to a small movie consisting of a single image that says “You need QuickTime 4.1 or later to see this movie.”
The HTML looks like this:
<EMBED SRC="UNeedQT41.mov" HEIGHT=256 WIDTH=320 |
QTSRC="smil1.smi"> |
Set the height and width to the dimensions of your SMIL presentation, adding 16 to the height for the movie controller. The usual plug-in parameters, such as AUTOSTART="True" and CONTROLLER="False", work normally.
Remember, the movie controller won’t have a Time slider unless you specify one using qt:time-slider="true" in the SMIL presentation. See “QuickTime SMIL Extensions” for details.
If your SMIL presentation is a different height or width from the movie specified in the SRC parameter, use the larger dimensions as your height and width, and set a background color using the BGCOLOR parameter to fill any gaps.
As long as the viewer’s browser is configured to use QuickTime for .mov files, the QuickTime plug-in is called when a .mov file is specified in the SRC parameter. If the viewer has a current version of the QuickTime plug-in, QuickTime plays the SMIL presentation specified in the QTSRC parameter. If the viewer has an older version of QuickTime, or the viewer’s browser is configured to use a different plug-in for .mov files, the viewer sees the single image movie instead.
Saving a SMIL Document as a .mov File
A SMIL document is really a text file. Saving it with the .sml file extension is a way to let the Web server and the browser know that it describes a SMIL presentation. Saving or renaming the same file with the .mov file extension normally causes the browser to use the QuickTime plug-in to handle the file. Add the eight-character string SMILtext to the beginning of the file so QuickTime knows what it is.
Important: The first eight characters of the file must be SMILtext in order for QuickTime to successfully import a SMIL file saved with the .mov file extension: <smil> becomes SMILtext <smil>.
The HTML looks like this:
<EMBED SRC="smil1.mov" HEIGHT=256 WIDTH=320> |
Set the height and width to the dimensions of your SMIL presentation, adding 16 to the height for the movie controller. All the optional parameters work normally.
The main disadvantage to this technique is that there’s no fallback movie if the viewer doesn’t have QuickTime 4.1 or later installed, or has Windows Media Player configured to handle .mov files.
Make sure your Web page has a “Get QuickTime” button if you use this method, and this shouldn’t be too much of a problem.
QuickTime Media Links XML Importer
QuickTime 5 introduces support for a new XML importer––QuickTime Media Links. This is a small XML file that has similar attributes to the embed tag in HTML used for the plug-in, but targets QuickTime Player instead of the plug-in. This section discusses the supported attributes and values, and how to create the file.
To work with the new QuickTime Media Links XML importer, you create a text file with the following two lines at the top of the file:
<?xml version="1.0"?> |
<?quicktime type="application/x-quicktime-media-link"?> |
Next, you add the embed tag itself:
<embed src="http://somewhere.com/Movies/test.mov" /> |
The following attributes and values are supported:
autoplay - true/false |
controller - true/false |
fullscreen - normal/double/half/current/full |
href - url |
kioskmode - true/false |
loop - true/false/palindrome |
movieid - integer |
moviename - string |
playeveryframe - true/false |
qtnext - url |
quitwhendone - true/false |
src - url (required) |
type - mime type |
volume - 0 (mute) - 100 (max) |
Note the following:
The
qtnextattribute only supports one URL (unlike the plug-in).All attributes require values (unlike the plug-in). Thus, the following is valid:
<embed src="http://somewhere.com/Movies/test.mov" autoplay="true" />
while this (although valid in HTML) is not:
<embed src="http://somewhere.com/Movies/test.mov" autoplay /> |
Only a subset of the possible attributes, however, need to be specified at once.
Support for the XML importer is packaged in a movie importer ('eat ' component) and is designed to work in any QuickTime-aware application. However, there is currently no file type or file extension associated with this type. Instead, the importer is found by using the MIME type when embedded in a XML movie. The MIME type is found in the line:
<?quicktime type="application/x-quicktime-reference"?> |
The purpose of this embed format is to serve as a text link that can be opened in QuickTime Player. Currently, the text link format (.qtl) is configured by the MIME settings panel to be specially routed to QuickTime Player and is never seen by the plug-in.
This format allows QuickTime Player to basically open the reference file and then set the appropriate attributes. There is no movie media involved as there is with SMIL.
The format can be used to author a movie with the specified options. Thus, in order to create a movie with the fullscreen and autoplay options set, you could create a file like the following, import it, and then save the resulting movie self-contained:
<?xml version="1.0"?> |
<?quicktime type="application/x-quicktime-media-link"?> |
<embed src="http://somewhere.com/Movies/test.mov" autoplay="true" |
fullscreen="double"/> |
Keep in mind that this is XML, and not HTML. Don’t forget the trailing "/>" in the embed line.
Making a Fast Start Reference Movie
You can open a SMIL document in QuickTime Player and save it as a self-contained movie. This creates a Fast Start movie that you can double-click from the desktop or embed in a Web page.
A Fast Start movie created this way typically has several tracks. The display area defined in the SMIL document’s root-layout element becomes a video track with the specified background color, and each media element in the SMIL document becomes a movie track with a URL data reference. The tracks are arranged in time and space as the SMIL document describes.
The media elements are not copied into the Fast Start movie, only their URLs. If your SMIL document uses relative URLs, you need to maintain the same relative path between the Fast Start movie and its media elements as existed between the original SMIL document and the media elements.
When the Fast Start movie is played in the QuickTime plug-in or QuickTime Player, each URL is resolved as needed. Embed it in a Web page as you would any Fast Start movie:
<EMBED SRC="smil1.mov" HEIGHT=256 WIDTH=320> |
Set the height and width to the dimensions of the movie, adding 16 to the height for the movie controller. All the optional parameters work normally.
The main advantage to this technique is that you can manipulate the SMIL presentation as a QuickTime movie in all the usual ways; set it to autoplay or play at double size in QuickTime Player, add locally stored tracks, or use Plug-in Helper to copy-protect the movie. In addition, the URLs of your media elements are concealed from the casual observer (it’s possible to ferret them out by doing an ASCII dump of the movie file, but they’re no longer in plain text).
Note: If you want to edit the movie using QuickTime Player’s editing features—to add a chapter list for example—you must set qt:time-slider="true" in the SMIL document before importing it. QuickTime Player’s editing features rely on the Time slider.
The main disadvantage of using a Fast Start movie is that you can’t edit or create it using a text editor or the text output of a script. You need to edit or create the SMIL document, import it into QuickTime Player, and save it. It’s an extra step.
The other disadvantage is the lack of a fallback movie for people with versions of QuickTime prior to 4.1.
Targeting QuickTime Player
You can specify an ordinary QuickTime movie in the SRC parameter and link it to a SMIL document using the HREF or QTNEXT parameter. As long as you specify TARGET="quicktimeplayer", the URL is handled directly by QuickTime, so the browser won’t misdirect it to a different player.
If you use a poster movie and the HREF parameter, the HTML looks like this:
<EMBED SRC="poster.mov" HEIGHT=160 WIDTH=120 |
AUTOSTART="False" CONTROLLER="False" |
HREF="smil1.smi" TARGET="quicktimeplayer"> |
Set the height and width to the dimensions of the poster. When someone clicks the poster, the SMIL document loads in QuickTime Player as a movie. Playing the movie causes QuickTime Player to fetch the media elements as needed.
If you want to launch a SMIL presentation in QuickTime Player without making the viewer click a poster, you can use QTNEXT instead of HREF. The HTML looks like this:
<EMBED SRC="Launch.mov" HEIGHT=320 WIDTH=240 |
AUTOSTART="True" CONTROLLER="False" |
QTNEXT1="smil1.smi" TARGET="quicktimeplayer" > |
Set the height and width to the dimensions of Launch.mov, which can optionally be an audio-only movie, and hidden (HIDDEN="True"). Launch.mov automatically plays in the QuickTime browser plug-in, then launches the SMIL presentation in QuickTime Player, outside the browser.
The main advantage to this approach is that the SMIL presentation takes place outside the browser, so you’re not constrained by the size or appearance of the browser window.
The main disadvantage to this technique is the lack of a fallback movie.
SMIL Support in QuickTime
As a simple, text-based language, SMIL allows content creators and providers to mix and synchronize multimedia elements. This capability, supported in QuickTime, enables content authors and developers to incorporate, for example, advertising clips into stored and live streams of QuickTime movies.
SMIL, derived from XML, describes the temporal and spatial layouts of media clips within media presentations. It also allows the optional specification of hyperlinks for each clip. Because SMIL elegantly describes simple sequences and because it uses a familiar HTML-like syntax for specifying hyperlinks, it is ideal for the purpose of advertising insertion.
QuickTime provides SMIL support for
stored streams (for example, Video On Demand, (VOD)), which enables content providers to insert an ad before, during or after a stream.
live streams, with the ability to insert an ad at the beginning of the stream.
parallel streams, for example, banner ads in a Web page.
SMIL Usage
From a server-side application, SMIL documents can be customized for a particular user. You can also define the content of the sequence dynamically. This capability is similar to a playlist, but unlike playlists, you can specify the spatial and temporal characteristics of the sequence.
For example, SMIL may be used in the following context. An end user clicks on a link in a Web browser or in a movie in QuickTime Player and then a server decides what will be the right sequence of media to present. In order to accomplish this, the server may generate a SMIL document via CGI or some other mechanism. The SMIL document may be a sequence of media, such as an advertisement followed by other content.
A Simple Sequence
In the example in Listing 9-1, an image starts by displaying a logo in JPEG format for five seconds. It then plays streaming video, which is a stored stream. This particular SMIL document does not specify the duration, which means that it will play for its entire length. Once it has finished, it will display the very same JPEG image at the end. Using this simple sequence, you could wrap or bracket a stream, for example, with your company logo.
Listing 9-1 A SMIL file displaying a JPEG image for five seconds, then playing a VOD stream to the end of the movie, followed by displaying a JPEG image without duration
<smil> |
<head> |
<layout> |
<region id="j_VOD_j" width="160" height="120" /> |
</layout> |
</head> |
<body> |
<!--start with 160 x 120 jpeg from url, for duration of 5 secs--> |
<img src="http://anyqtpartners.apple.com/ad/Images/image.jpg" |
dur="5s"region="j_VOD_j"/> |
<!--insert VOD movie, plays to end of movie--> |
<video src="rtsp://anycoolqtsdemo.apple.com/ql41/codecs/sorenmodqt.mov" |
region="j_VOD_j"/> |
<!--then back to orig jpeg from url for duration of 5 seconds |
(duration required for display)--> |
<img src="http://anyqtpartners.apple.com/ad/Images/image.jpg" |
region="j_VOD_j" dur="5s"/> |
</body> |
</smil> |
Simple sequences are very easy to create. In the body of a SMIL document, you can explicitly state that this is a sequence by using the <seq> tag. If you don’t, the default will still be a sequence.
A Sequence with HREF, Region and Background Text
In the example in Listing 9-2, a streamed video of known duration that is hyperlinked is displayed for its entire duration, followed by a live video stream.
In this more complex example, you specify a background color that defines a single region with a width and height. This one defines several regions and is more elaborate about the layout. It tells you that the overall presentation should be a certain size, the background color should be a certain value, and within the root layout you have several other regions which you use in playback. In this example, the playback is at 100 percent of the width and height.
The result is an iBook commercial that appears first via RTSP. If you click in the content region during its duration, you invoke the URL in a browser window, launching the browser if it is not already open. Once the iBook commercial is finished, it is followed by the Apple PowerMac G4 tanks commercial via RTSP.
Listing 9-2 A SMIL file displaying a streamed video of known duration, which is click- through enabled (hyperlinked), followed by a live video stream
<smil xmlns:qt="http://www.apple.com/quicktime/resources/smilextensions" qt:autoplay="true"> |
<head> |
<layout> |
<root-layout id="rl" width="250" height="250" background-color="green" /> |
<region id="vodAd" width="240" height="180" /> |
<region id="vodmovie" width="100%" height="100%" fit="fill" /> |
</layout> |
</head> |
<body> |
<seq> |
<a href="http://www.apple.com" show="new"> |
<!-- VOD ad --> |
<video src="rtsp://coolqtsdemo.apple.com/ads/vodibooklow.mov" |
region="vodAD" /></a> |
<!-- to a VOD movie --> |
<video src="rtsp://cool.apple.com/ads/vodtankslow.mov" region="vodmovie "/> |
</seq> |
</body> |
</smil> |
It is possible to extend these examples and introduce more elaborate spatial and temporal layouts, so that you can make more than one thing happen at a time. You can have sequences within hierarchies, for example.
QuickTime SMIL Extensions in Detail
This section discusses in greater detail the extensions to SMIL that are implemented as part of the SMIL support provided in QuickTime . As an XML markup language, SMIL describes the XML namespace under which the extensions are grouped; it also describes the extensions themselves––grouped according to the SMIL elements they may be used in conjunction with––their syntax, and example usage.
The QuickTime SMIL extensions allow an author to optionally specify richer behaviors that are supported by QuickTime but do not have an SMIL equivalent; they also give the author tighter control over the behavior of the playback of SMIL presentations across bandwidth-constrained network connections.
Namespace Specification
These extensions to SMIL are described in a separate namespace from SMIL and must be referenced explicitly by any SMIL document that wants to take advantage of them. The namespace URL is <http://www.apple.com/quicktime/resources/smilextensions>. The syntax for referencing the namespace is:
xmlns:nsprefix=" http://www.apple.com/quicktime/resources smilextensions " |
which must be used as an attribute to any SMIL element. Nsprefix (the selected namespace prefix) may be any character string which conforms to the requirements for an XML name. Once the namespace has been referenced by a SMIL element, that element itself or any elements within it may legally use the names defined in the namespace, and the usage is as follows:
nsprefix:qt_attribute=attribute_value |
In general, it is simplest to place the xmlns reference as the first attribute in the root <smil> element. It is also suggested, as a convention, that the namespace prefix for the QuickTime SMIL Extensions be ‘qt’, though this isn’t required for correct operation; all subsequent examples in this section assume this is so.
SMIL Root Element Attributes
The QuickTime SMIL extensions define the following additional attributes for the <smil> element:
autoplay: Specifies whether the resulting presentation should automatically start playback upon instantiation. Legal values are either
"true"or"false,"and the default is"false."Common usage is:<smil qt:autoplay="true"/>
next: Specifies to the player that after this presentation is finished, the presentation referenced in the attribute value should be invoked and played in the same space. Used to chain presentations together. A valid attribute value is any URL. This capability is equivalent to the QuickTime browser plug-in’s “qtnext” attribute. Common usage is:
<smil qt:next="nextpresentation.smi"/>
time-slider: Specifies whether a time line should be displayed as part of the user interface. Because by default the QuickTime playback engine dynamically loads media objects as required, the duration of the overall media presentation can change as a movie is played or navigated. When the duration changes, the time line will change to reflect that. This can be unnecessarily confusing to the user. Therefore, by default, QuickTime movies created from a SMIL document do not display a time line as part of their user interface. This behavior can be overriden using the “time-slider” attribute. Common usage is:
<smil qt:time-slider="true"/>
immediate-instantiation: Specifies whether the media objects within the presentation should be instantiated immediately, i.e., at the same time the presentation itself is instantiated, or whether instantiation should be deferred until the element is ready to be played back. Legal values are either
"true"or"false,"and the default is"false."The value of this attribute may be overridden on a media-object basis by using it as an attribute to individual media-object elements, as described below. Because this attribute causes all media objects to be instantiated, it can take considerable time and memory for a complex presentation or one being loaded over a slow network connection. Therefore, it is recommended that it only be used on small media objects. Common usage is:<smil qt:immediate-instantiation="true"/>
chapter-mode: Specifies to the player, both QuickTime Player and the Movie Controller, the way in which chapters should be used in the user interface when a time line is part of the interface. The chapter-mode attribute can have a value of “all” or “clip”. If the attribute is not present, the default value is “all”. If the chapter-mode attribute is “all”, then the player displays the time line of the entire duration of the presentation. Each chapter represents a point along that time line. If the chapter-mode attribute is set to “clip”, then the time line no longer represents the entire duration of presentation. Instead, it represents the duration of the current chapter. The “clip” behavior is useful for long presentations where the granularity of the timeline may be unacceptably low. It is also useful for network-based presentations, particularly those using streaming media, where the actual duration of a clip isn’t known until it has started to play. By using the “clip” value of the chapter-mode, the user will not be exposed to the duration changes of the presentation caused by the loading of media as the presentation is played or navigated. Common usage is:
<smil qt:chapter-mode="clip"/>
Media Object Attributes
composite-mode: Specifies how to composite a visual media element with other visual media elements behind it. Its value is a combination of a text string identifying the mode and an optional semicolon and second parameter, which will vary depending on the mode itself. The composite-mode SMIL attribute is equivalent to the graphics mode property of a Movie’s Media. Possible modes are:
copy, none, direct: Specifies a direct copy. The default composite mode for most image formats.
blend;percent : Specifies a weighted blend between the image and the background, with a required percent integer value (i.e., “50%”) specifying the blend weight. 0% means complete transparency, 100% complete opacity.
transparent-color;color: Specifies that all pixels of a particular color within the image should be treated as transparent, similar to transparency in GIF files [GIF89]. It accepts a second parameter, color, which specifies the color to be rendered as transparent. The color parameter may be any valid color specification supported by Cascading Style Sheets Level 2 4.
alpha, straight-alpha, premultiplied-white-alpha, premultiplied-black-alpha: Specify that the image has an internal alpha channel which should be used when compositing.
Alphaandstraight-alpharefer to a separate alpha component; thepremultipliedmodes refer to an image which has been premultiplied with the alpha against a white or black background, respectively.straight-alpha-blend: Specifies that the image has an internal alpha channel as a separate component, and that when compositing the alpha weight should also be multiplied by a percentage blend value, which is specified by a second parameter, similar to the second parameter in blend mode.
Example usage:
<imgsrc="test.png"qt:composite-mode="alpha"/> |
immediate-instantiation: Performs the same function as the identically named attribute for the
<smil>root element, though affecting only this particular media object instead of the entire presentation. Example usage:<imgsrc="bkgimage.png"qt:immediate-instantiation="true"/>
bitrate: Specifies the bitrate at which a media object would need to be transmitted in order to play back in real time. It is used in conjunction with
immediate-instantiation, in order to give QuickTime enough information to decide how far in advance it should attempt to read a delayed-instantiation media object in order to provide seamless playback. Possible values are positive integers, in units of bits-per-second. Example usage:<videosrc="stream56k.mov"qt:bitrate="56000"qt:immediate-instantiation="true"/>
system-mime-type-supported: Specifies to the player the MIME type that needs to be supported in order to be able to play back this particular media-object. Though similar, at first blush, to the type attribute, this is intended to be used in conjunction with the switch element in SMIL, in a similar fashion as the other system attributes, such as system bitrate and system screen definitions. Possible values are character strings matching a valid MIME type. Example usage is:
<switch>
<imgsrc="qt.mov"qt:system-mime-type-supported="video/quicktime"/>
<imgsrc="someotherformat.suffix"qt:system-mime-type-supported= "some-other/format’s-mime-type"/>
attach-timebase: Defaults to "true", which slaves the timebase of the child movie to the parent’s. This means that play/pause controls will control the child movie as well as the parent. Setting it to
"false"unlinks the timebase, which is useful for interactivity operations, especially when using the SMIL<par>tag. Note that when doing this, you need to provide some other way to control the child movie, presumably through the use of actions. Example usage:<imgsrc="movie2.mov" qt:attach-timebase="true"/>
chapter: Specifies to the player a chapter name to attach to this particular media object, which then may be used by the player to provide a higher-level navigation UI than a simple linear control. Valid values are any character string, and example usage is:
<imgsrc="movie1.mov"qt:chapter="chap1"/>
Anchor-Tag and A-Tag Attributes
target: Specifies where the presentation specified by the
hrefattribute in the anchor tag will play; possible values are any values legal in the QuickTime Plug-in’sqtnextattribute. The target attribute can also be used to specify that a media object should be opened in the QuickTime Player, a new browser window, a QuickTime Player window, or a particular frame in the browser. Example usage:<ahref="destination.mov"target="quicktimeplayer">
Movie Media Track
The SMIL importer creates a movie media track for each media element in the SMIL composition. This is done primarily to accommodate the potentially unknown spatial layout of each element. Because a track can only have one location and size, if multiple media elements were combined in a single track the track would need to be resized and moved at runtime with much greater frequency than if each element is in its own track.
The SMIL importer always creates a single video track which uses a solid color fill based on the background color specified in the SMIL document. This track exists for the entire duration of the SMIL composition, though it may or may not be visible depending on the overall layout.
Movie Media Track Usage
Because SMIL can refer to content indirectly and because access to media is avoided until as late as possible before displaying it––in order to preserve meaningful hit counts––the specific types of content a SMIL document references may not be known at import time.
To handle this situation, QuickTime creates a generalized type of track that can play any type of content that QuickTime can import into a movie. Using this new type of track––called a movie track––the SMIL importer doesn’t have to “know” the type of the content a SMIL document references. It simply creates a movie track for each piece of content, and the movie track makes use of QuickTime’s extensive import facilities at the time the content is played. This new type of track is implemented by the Movie Media Handler.
Movie media is used to encapsulate embedded movies within QuickTime movies.
Movie Media Handler
This section describes the features of the Movie Media handler available in QuickTime.
Movie Sample Description
The movie media doesn’t have a unique sample description. It uses the minimum sample description, which is SampleDescriptionRecord.
Movie Media Sample Format
Each sample in the movie media is a QuickTime atom container. All root level atoms and their contents are enumerated in the following list. Note that the contents of all atoms are stored in big-endian format.
kMovieMediaDataReferenceThis atom contains a data reference type and a data reference. The data reference type is stored as an
OSTypeat the start of the atom. The data reference is stored following the data reference type. If the data reference type is URL and the data reference is for a movie on the Apple website, the contents of the atom would be:url http://www.apple.com/foo.mov.There may be more than one atom of this type. The first atom of this type should have an atom ID of 1. Additional data references should be numbered sequentially.
kMovieMediaDefaultDataReferenceIDThis atom contains a
QTAtomIDthat indicates the ID of the data reference to use when instantiating the embedded movie for this sample. If this atom is not present, the data reference with an ID of 1 is used.kMovieMediaSlaveTimeThis atom contains a Boolean that indicates whether or not the
TimeBaseof the embedded movie should be slaved to theTimeBaseof the parent movie. If theTimeBaseis slaved, the embedded movie’s zero time will correspond to the start time of its movie media sample. Further, the playback rate of the embedded movie will always be the same as the parent movie’s. If theTimeBaseis not slaved, the embedded movie will default to a rate of 0, and a default time of whatever default time value it instantiated with (which may not be 0). If theTimeBaseis not slaved, the embedded movie can be played by either including anAutoPlayatom in the movie media sample or by using a wired action. If this atom is not present, the embedded movie defaults to not slaved.kMovieMediaSlaveAudioThis atom contains a Boolean that indicates whether or not the audio properties of the embedded movie should be slaved to those of the parent movie. When audio is slaved, all audio properties of the containing track are duplicated in the embedded movie. These properties include sound volume, balance, bass and treble, and level metering. If this atom is not present, the embedded movie defaults to not slaved audio.
kMovieMediaSlaveGraphicsModeThis atom contains a Boolean that indicates how the graphics mode of the containing track is applied to the embedded movie. If the graphics mode is not slaved, then the entire embedded movie is imaged using its own graphics modes. The result of the drawing of the embedded movie is composited onto the containing movie using the graphics mode of the containing track. If the graphics mode is slaved, then the graphics mode of each track in the embedded movie is ignored and instead the graphics mode of the containing track is used. In this case, the tracks of the embedded movie composite their drawing directly into the parent movie’s contents. If this atom is not present, the graphics mode defaults to not slaved. Graphics mode slaving is useful for compositing semi-transparent media––for example, a PNG with an alpha channel––on top of other media.
kMovieMediaSlaveTrackDurationThis atom contains a Boolean that indicates how the Movie Media Handler should react when the duration of the embedded movie is different than the duration of the movie media sample that it is contained by. When the movie media sample is created, the duration of the embedded movie may not yet be known. Therefore, the duration of the media sample may not be correct. In this case, the Movie Media Handler can do one of two things. If this atom is not present or it contains a value of false, the Movie Media Handler will respect the duration of media sample that contains the embedded movie. If the embedded movie has a longer duration than the movie media sample, the embedded movie will be truncated to the duration of the containing movie media sample. If the embedded movie is shorter, there will be a gap after it is finished playing. If this atom contains a value of true, the duration of the movie media sample will be adjusted to match the actual duration of the embedded movie. Because it is not possible to change an existing media sample, this will cause a new media sample to be added to the movie and the track’s edit list to be updated to reference the new sample instead of the original sample.
Note: When the duration of the embedded movie’s sample is adjusted, by default no other tracks are adjusted. This can cause the overall temporal composition to change in unintended ways. To maintain the complete temporal composition, a higher-level data structure which describes the temporal relationships between the various tracks must also be included with the movie.
kMovieMediaAutoPlayThis atom contains a Boolean that indicates whether or not the embedded movie should start playing immediately after being instantiated. This atom is only used if the
TimeBaseof the embedded movie is not slaved to the parent movie (see thekMovieMediaSlaveTimeatom for more information). If auto play is requested, the movie will be played at its preferred rate after being instantiated. If this atom is not present, the embedded movie will not automatically play.kMovieMediaLoopThis atom contains a
UInt8that indicates how the embedded movie should loop. This atom is only used if theTimeBaseof the embedded movie is not slaved to the parent movie (see thekMovieMediaSlaveTimeatom for more information). If this atom contains a 0, or if this atom is not present, the embedded movie will not loop. If this atom contains a value of 1, the embedded movie loops normally––that is, when it reaches the end it loops back to the beginning. If this atom contains a value of 2, the embedded movie uses palindromic looping. All other values are reserved.kMovieMediaUseMIMETypeThis atom contains text (not a C string or a pascal string) that indicates the MIME type of the movie import component that should be used to instantiate this media. This is useful in cases where the data reference may not contain MIME type information. If this atom is not present, the MIME type of the data reference as determined at instantiation time is used. This atom is intended to allow content creators a method for working around MIME type binding problems. It should not typically be required, and should not be included in movie media samples by default.
kMovieMediaTitleCurrently unused. It would contain text indicating the name of the embedded movie.
kMovieMediaAltTextThis atom contains text (not a C string or a pascal string) that is displayed to the user when the embedded movie is being instantiated or if the embedded movie cannot be instantiated. If this atom is not present, the name of the data reference (typically the file name) is used.
kMovieMediaClipBeginThis atom contains a
MovieMediaTimeRecordthat indicates the time of the embedded movie that should be used. The clip begin atom provides a way to specify that a portion of the beginning of the embedded movie should not be used. If this atom is not present, the beginning of the embedded movie is not changed. Note that this atom does not change the time at which the embedded movie begins playing in the parent movie’s time line. If the time specified in the clip begin atom is greater than the duration of the embedded movie, then the embedded movie will not play at all.struct MovieMediaTimeRecord {wide time;
TimeScale scale;
};
kMovieMediaClipDurationThis atom contains a
MovieMediaTimeRecordthat indicates the duration of the embedded movie that should be used. The clip duration atom is applied by removing media from end of the embedded movie. If the clip duration atom is not present, then no media is removed from the end of the embedded movie. In situations where the sample contains both a clip duration and a clip begin atom, the clip begin is applied first. If the clip duration specifies a value that is larger than the duration of the embedded movie, no change is made to the embedded movie.kMovieMediaEnableFrameSteppingThis atom contains a Boolean that indicates whether or not the embedded movie should be considered when performing step operations, specifically using the interesting time calls with the
nextTimeStepflag. If this atom is not present or is set tofalse, the embedded movie is not included in step calculations. If the atom is set totrue, it is included in step calculations.kMovieMediaBackgroundColorThis atom contains an
RGBColorthat is used for filling the background when the movie is being instantiated or when it fails to instantiate.kMovieMediaRegionAtomThis atom contains a number of child atoms, shown below, which describe how the Movie Media Handler should resize the embedded movie. If this atom is not present, the movie media handler resizes the child movie to completely fill the containing track’s box.
kMovieMediaSpatialAdjustmentThis atom contains an
OSTypethat indicates how the embedded movie should be scaled to fit the track box. If this atom is not present, the default value iskMovieMediaFitFill. These modes are all based on SMIL layout options.kMovieMediaFitClipIfNecessaryIf the media is larger than the track box, it will be clipped; if it is smaller, any additional area will be transparent.
kMovieMediaFitFillThe media will be scaled to completely fill the track box.
kMovieMediaFitMeetThe media is proportionally scaled so that it is entirely visible in the track box and fills the largest area possible without changing the aspect ratio.
kMovieMediaFitSliceThe media is scaled proportionally so that the smaller dimension is completely visible.
kMovieMediaFitScrollNot currently implemented. It currently has the same behavior as
kMovieMediaFitClipIfNecessary. When implemented, it will have the behavior described in the SMIL specification for a scrolling layout element.kMovieMediaRectangleAtomThis atom contains four child atoms that define a rectangle. Not all child atoms must be present: top and left must both appear together, width and height must both appear together. The dimensions contained in this rectangle are used in place of the track box when applying the contents of the spatial adjustment atom. If the top and left are not specified, the top and left of the containing track’s box are used. If the width and height are not specified, the width and height of the containing track’s box are used. Each child atom contains a
UInt32.kMovieMediaTop kMovieMediaLeft kMovieMediaWidth kMovieMediaHeight
References
These are some of the documents that are useful sources of information about SMIL.
Synchronized Multimedia Integration Language (SMIL) 1.0 Specification, P. Hoschka, 15 June 1998. Available at
<http://www.w3.org/TR/1998/REC-smil-19980615>.)Extensible Markup Language (XML) 1.0, T. Bray, J. Paoli and C.M. Sperberg-McQueen, 10 February 1998. Available at
<http://www.w3.org/TR/1998/REC-xml-19980210>.Namespaces in XML, T. Bray, D. Hollander and A. Layman, 14 January 1999. Available at
<http://www.w3.org/TR/REC-xml-names>.Cascading Style Sheets, Level 2, T. Bray, D. Hollander and A. Layman, 14 January 1999. Available at
<http://www.w3.org/TR/REC-xml-names>.
© 2003, 2002 Apple Computer, Inc. All Rights Reserved. (Last updated: 2002-10-01)